Category Archives: Tutorial

Tutorial

Bookmarklet example

TheMonolith HTML5 tutorial introduction

The tutorial topic is going to cover the creation of Google Apps script web app and a Chrome bookmarklet extension, which we’ll use to submit form data over the internet (via HTTP) to a remote endpoint/service, where this data will be processes server-side and put into data table. We’ll essentially be saving data to a web app database by clicking the extension icon and invoking some Javascript to get the current page’s URL and title (as well as selected text and other form data) and send it to a popup form; submitting this form saves the data to server.

bm-ex-1-scrn

The structure of a Chrome extension is a lot simpler than you think. They are just a collection with HTML and Javascript files and CSS for UI/styling. This makes making or developing extensions much more accessible for amateur developers.

Right, so let’s get started. As always, a Chrome extension will require us to create some example files to load the extension so we can begin our local development. Go ahead and open up your text editor, create a new directory for the project and add the files:

manifest.json – (Github source)

This is the glue that holds our extension together. It contains the basic meta data about the extension (title, description, icons etc), as well as acting as a pointer to the various files that contain the extension’s user interface and JavaScript code. It also defines permissions that specify which browser components and external URLs the extension is allowed to access. The manifest for our extension looks like this:

bm-ex-1-manifest

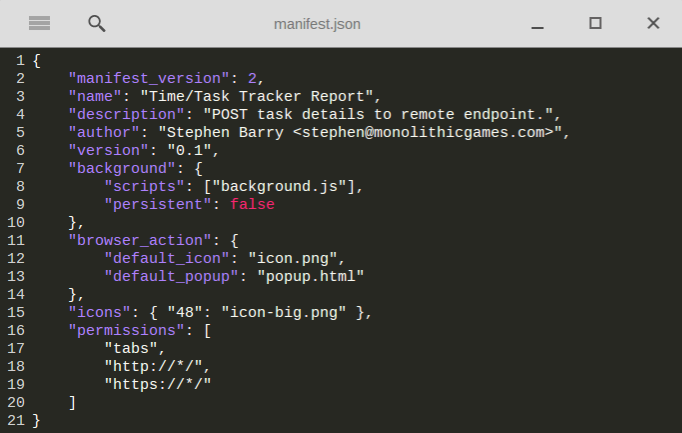
The background property points to a JavaScript file which contains the logic code for the extension (in this example, mine is called background.js). The browser_action section defines a button with an icon (here, icon.png), which the user will click to open the bookmarking dialog, and the popup property points to the file containing the dialog form HTML.

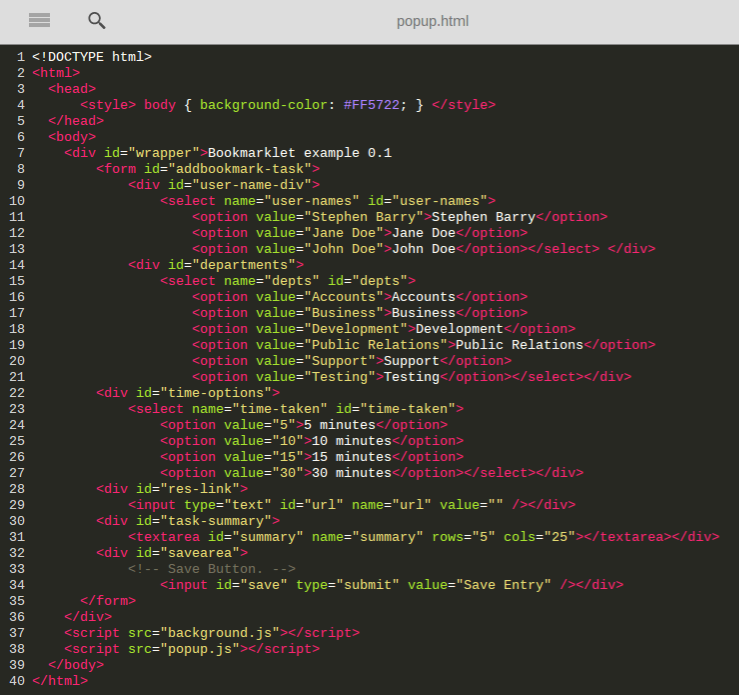
popup.html – (Github source)

This file contains our UI: a basic HTML form with user-names, depts, time-taken, url and summary and fields (so that we can edit and organise our bookmark/data before saving it to the server-side).

bm-ex-1-popup-html

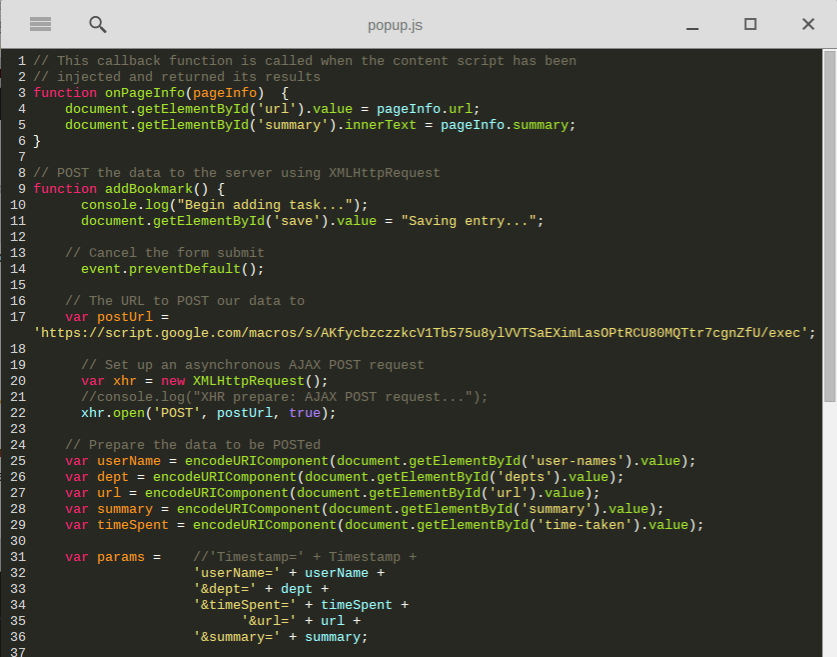
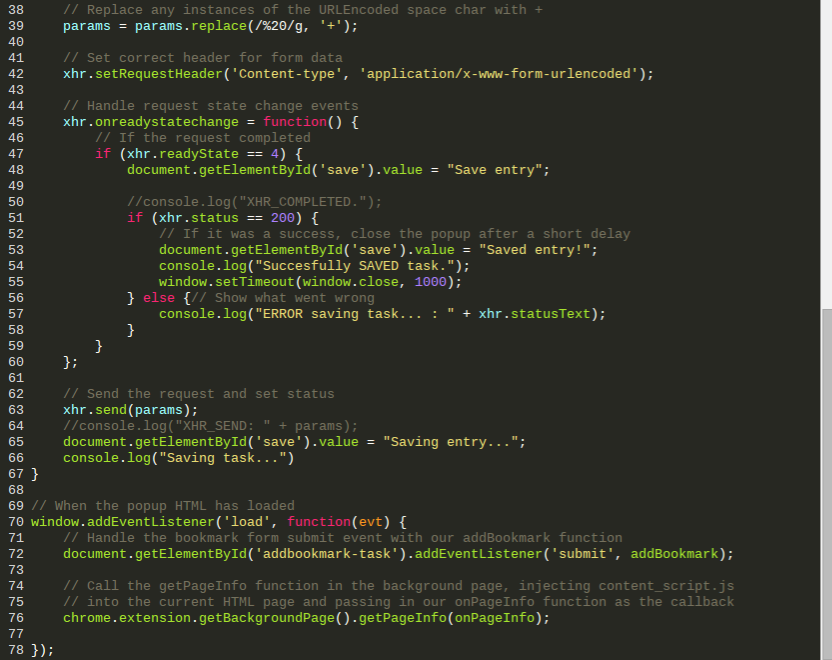
popup.js – (Github source)

This file contains JavaScript code to populate and save field values.

bm-ex-1-popup-1

bm-ex-1-popup-2

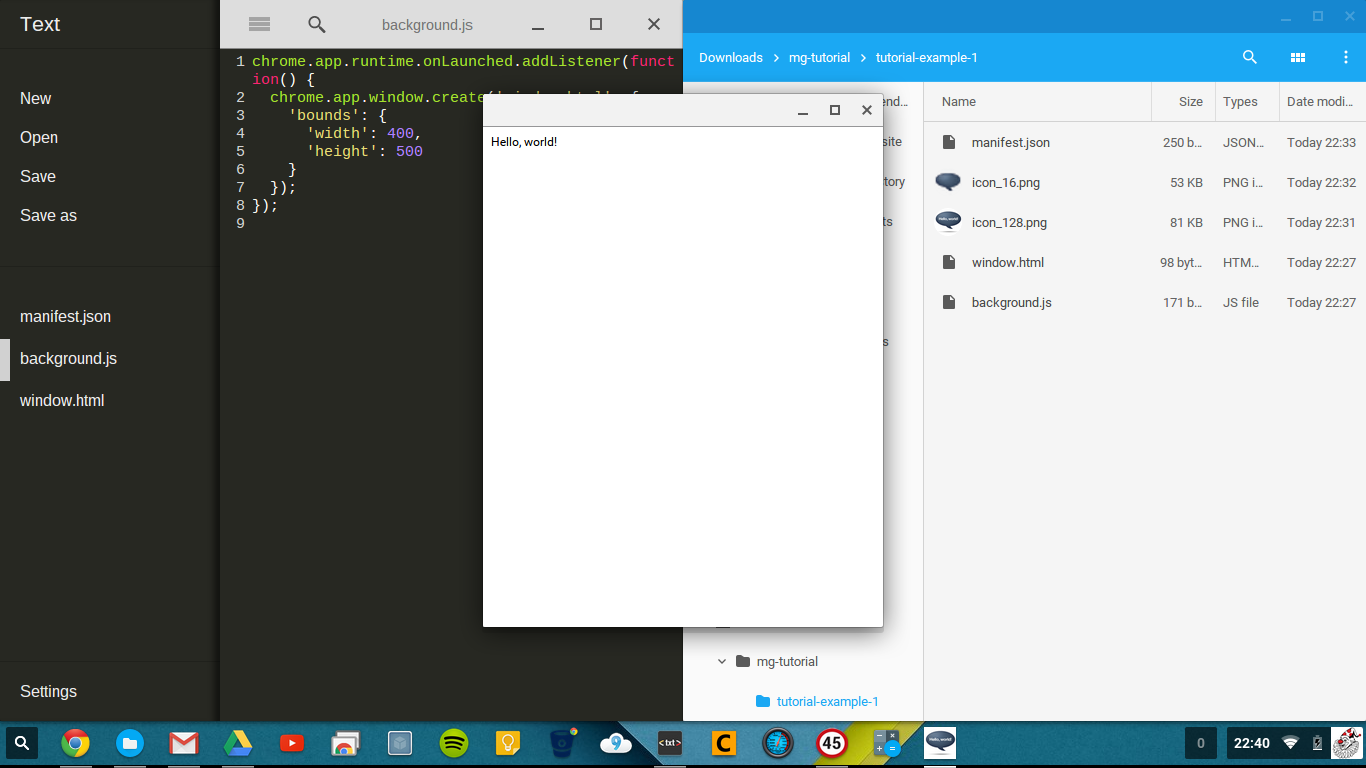
background.js – (Github source)

Think of this file as the negotiator between the popup dialog and the content/DOM of the currently loaded web page. getPageInfo is the function we called when our popup loaded, and its parameter is the callback function which sets the values of the form fields in popup.js.

bm-ex-2-bground

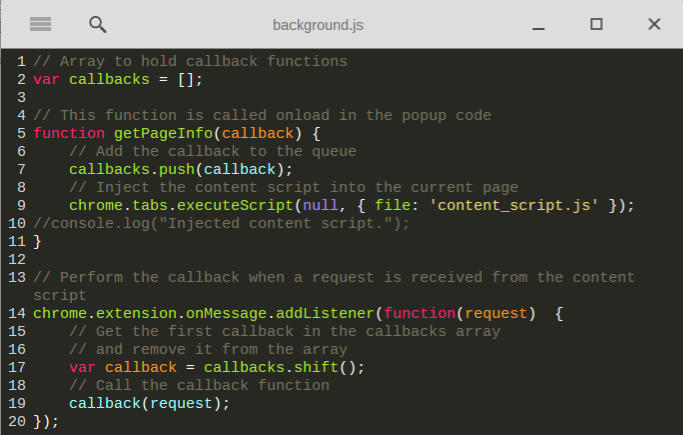
When getPageInfo is called, it injects the content script (below) into the DOM of the current web page and executes it. It then sets up an event listener to listen for the onMessage event which will be triggered by the content script.

content_script.js – (Github source)

The content script itself is pretty simple: it just gets the url and any selected text (summary field) from the current page and passes them back to the event script by calling sendMessage, which triggers the onMessage event we’re listening for in background.js.

bm-ex-2-content-script

The event script listener then calls the callback function it was passed (which, if you remember, is the pageInfo function from the popup page), passing in the information about the page so that it can populate the form field values.

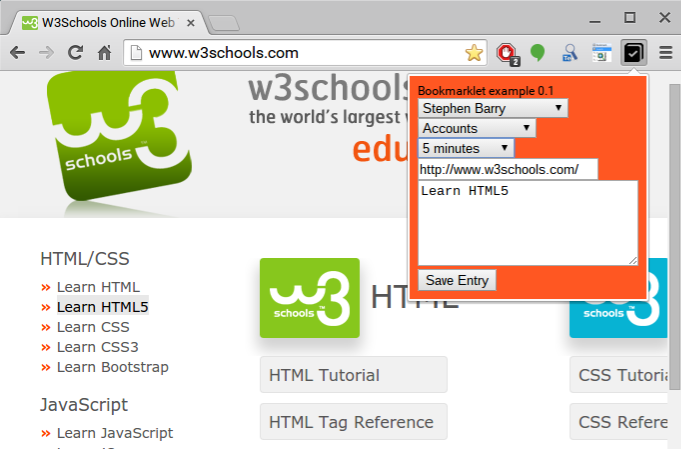
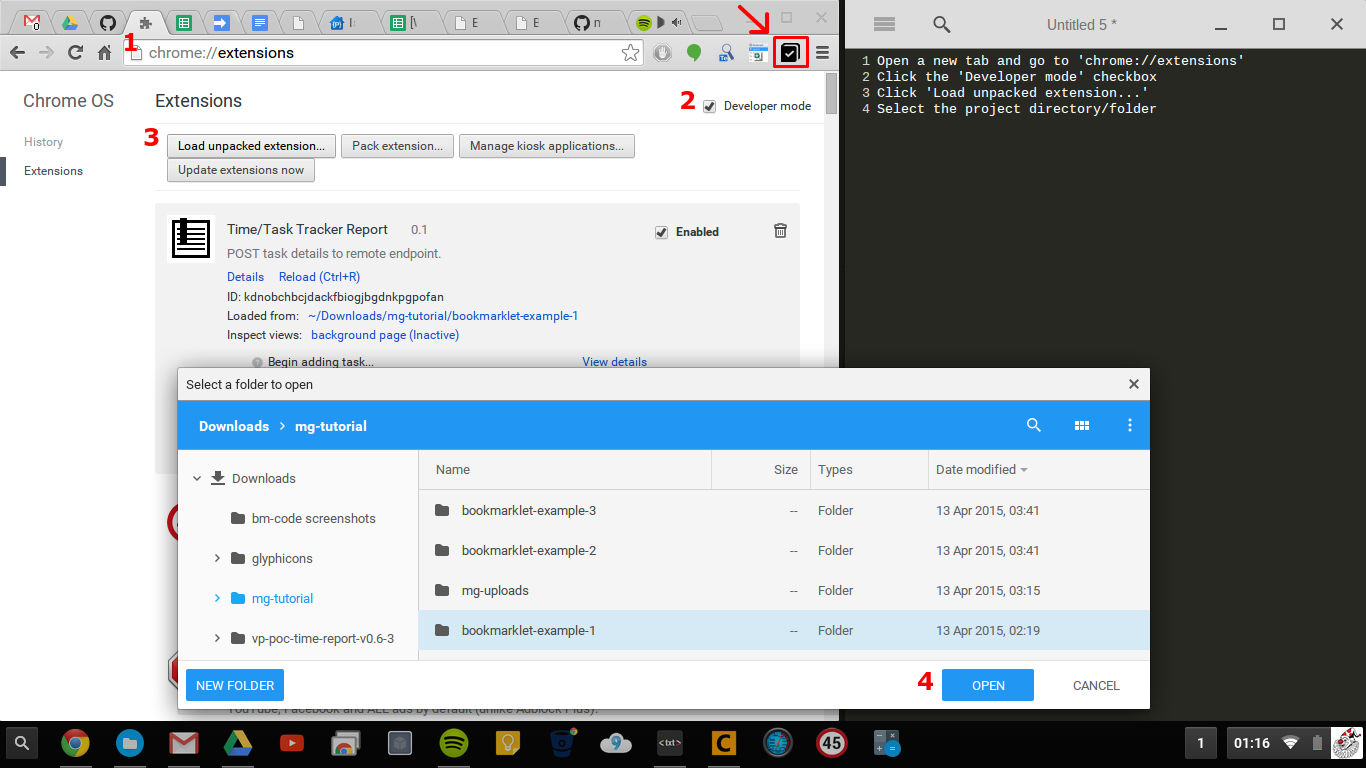
Now if we’ve done everything correctly, we should be able to load the extension from the ‘chrome://extensions‘ page. Click the ‘Developer mode‘ checkbox and then click ‘Load unpackaged extension‘ and select the folder containing our code and ‘Launch‘.

cr-dev-mode-load

Et voliá, This doesn’t look so bad, albeit bland, basic and lacking any styling, and if you set some values and close/reopen the page you lose the selections 🙁

bm-ex-1-final

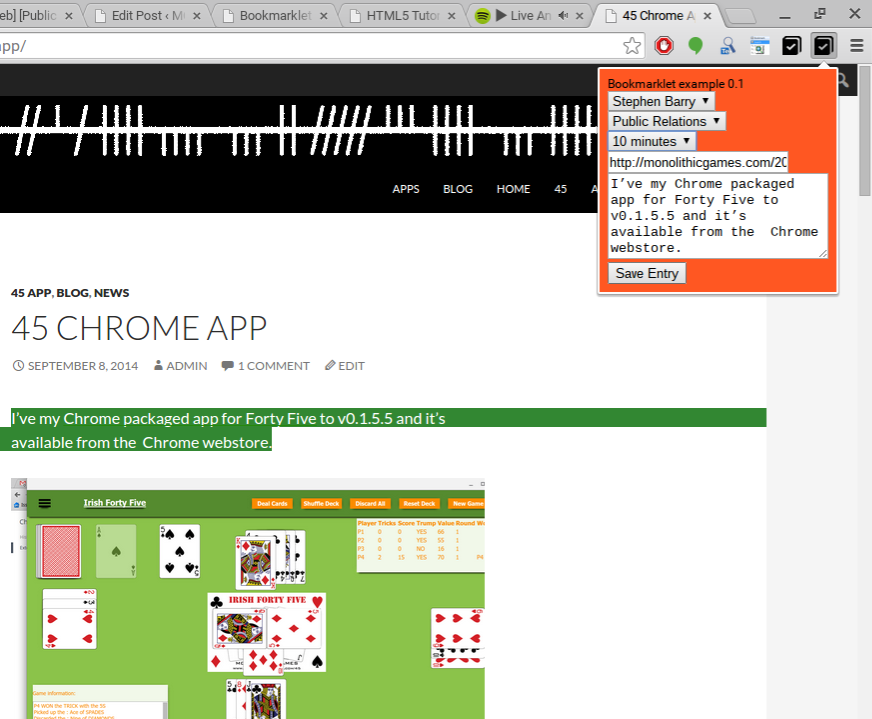
But, overall, I think we’ve a good base data structure and list of buckets to organise this data. Hmm, we’ll make to need some objects such as the username, department and task options persist and we’ll also try to hide the task options that don’t apply to us, as well as implementing some additional basic functionality. This extension could yet have some potential usefulness! Check out the sheet below to see it in action (I’ll explain the Sheet and Apps script backend next in part 2).

===> PART 2:        Feedback and comments welcome!


HTML5 Tutorial Series

# Introduction:

Hi, thanks for taking the time to read this blog post firstly. In this article (and perhaps series), I’m going to introduce some basics in web/app development and share some of my pitfalls and experiences along the way while I grappled with HTML5. So to begin with, a little about me…

MG-jokerI’m Stephen (or Steve a.k.a. TheMonolith) and I’m a graduate architect from the School of Architecture in the University of Limerick (SAUL) but now working within the IT services industry. I graduated in May 2012 and I’ve always had a keen interest in making things, problem solving, understanding how things work and being a bit of a nerd. My programming and computer/technological skills are largely self-taught, some acquired in college and refined from years of tinkering and from the interwebz (sic) and from my day job. Monolithic Games is my own little design/development studio to keep me occupied in my spare-time, and I’ve been coding for about the last 18 months or so.

It wasn’t really until 3rd year (2008) that I really started using serious pieces of software for architecture work and projects, such as, CAD drawings, photomontages, 3D modelling and photo-realistic rendering. It helped that I made a beast of a home-built PC that was pretty capable CPU-wise, a dedicated graphics card and a pretty decent amount of RAM (now upgraded to 8GB). Fast forward a bit and I’m working in a technical support role in a call-center environment and being exposed to all sorts of crazy things that computers can do and how the internet works…it’s pretty amazing really. How it all – just – works.

The first programming language that I sat down to learn (from a …for Dummies book) was BASIC. As a first language it was fairly forgiving and wasn’t too head melty to try and get your head around.

PRINT stuff;

Makes sense right?

“Computer print ‘stuff’ on the screen”

“OK”


stuff

Next I tried Java, but man it’s tough going and very difficult, as a program will refuse to compile for a plethora of unknown reasons. I’ll be honest, I didn’t get very far, as I felt I needed to write my own example app/code, in order to actually understand what I was doing. Soon, I decided to just start with HTML, XHTML, CSS and Javascript. Eventually, I had an example game/webpage (or in actuality, a HTML file and some other files, that did stuff) to try and port to a Chrome extension but Chrome’s Content Security Policy hated the guts out of my gnarly, old-school code from circa 1995, and loads of parts were broken, especially HTML onclick events 🙁 The web version of my app is totally borked at the moment due to a similar affliction. After some confusion and late nights searching the interwebz for the meaning of ReferenceError, and undefined is null, and finally wrapping my head around event handlers, I finally had a HTML5 card game Chrome packaged app to display.

ff-overview

My first game, is called Irish Forty Five and it’s a HTML5 alpha card game app, based on the rules of 45, played in my area of Cork and throughout Ireland and further afield. It looks pretty (at least I think so) after a Material Design inspired makeover. I’m currently a bit stuck at the moment on the next iteration of game, so for now this is a working example, doesn’t have all of the rules implemented yet (follow suit, best trump, scoring, non-trump winning cards, AI etc). But, you can technically play a full game, with multiple rounds and win. I’m no coding expert and I don’t pretend to be so I hope you enjoy this starter to the HTML5 tutorial series. Feedback and comments welcome. Part 1 ==>


# Part 1 – v0.0

So, what is HTML and what does it do? HTML is, HyperText Markup Language and it’s a markup language used to create webpages and consists of HTML elements or tags, enclosed with angle brackets (e.g. <html>). Generally, these appear as opening and closing pairs, such as: <body></body> but also as empty or unpaired tags, such as <img>.

Let’s take a look at the structure of a basic HTML file, called index.html.

index.html – Example HTML file


<!DOCTYPE html>

<html>

 <head>

<title>My first app</title>

</head>

 <body>

  <div>Hello, world!</div>

 </body>

</html>


Simples, right? We can see that we define the following elements and I outline their meaning of function.


<!DOCTYPE html> – defines that the file is a HTML document

<html> – starting or opening <html> element tag

 <head> – starting or opening <head> element tag

<title> – opening <title>  tag element tag

My first app </title> – closing <title> element tag

 </head> – closing <head> element tag

 <body> – starting or opening <body> element tag

   <div> Hello, world! – opening <div> element, containing text  (i.e. Hello, world!)

</div> closing <div> element tag

</body> – closing <body> element tag

</html> – closing <html> element tag


You can also see that there’s a sort of hierarchy or nested structure defines the file and where certain elements are expected. The above example is pretty much the most basic HTML file you can have. Let’s flesh this example out a bit and see if we can get the page to display or do something for us. I’ve uploaded some example sources files that you can download and open with your favourite text editor or pull into your development environment/IDE.

I’m going to start off with a very simple Chrome app and we’ll expand the functionality as we go, in order to learn some basic principles and try and make the journey a bit easier, and introduce CSS and Javascript as we go. I’ll also point out some pitfalls that I encountered and how I overcome them or worked around them. All examples code and milestones, as well as the source for some of my other projects can be found on GitHub.


# Part 2: v0.1 – First Chrome packaged app

What is a Chrome packaged app?? A packaged app for Chrome is an offline-enabled and web application that runs within Chrome browser, sandboxed in it’s own window and uses HTML, CSS and Javascript a.k.a. HTML5. As I got a Dell 11 Chromebook a few months back, I’ve been using Google’s Chrome OS as my main development machine so a local, packaged app made sense as I didn’t need to setup a webserver. Further information on Chrome apps can be found at https://developer.chrome.com/apps/first_app.

The bare essential components to load a packaged app in Chrome requires a few simple steps, some basic files and a text editor of your choice. Firstly, the basic file requirements are:


manifest.json – A JSON formatted manifest file explicitly declaring permissions etc

background.js – A background Javascript file to run the app

index.html – The HTML file to dictating what the app displays

icon.png – At least one 16px  X  16px icon image file required


Let’s get started to make our own package app by first installing Google Chrome and enabling Developer mode at chrome://extensions, following the steps below.

  • Open Chrome and navigate to chrome://extensions and check the ‘Developer mode’ checkbox

Now create a folder or empty directory somewhere on your local drive, for my example, I’ll call this ‘tutorial-example-1’. Fire up your text editor, personally my favourite is Sublime, but it’s not available in a traditional method on Chrome OS, so I use either the default Chrome OS Text app or the Caret app, but any text editor will do such as, Notepad++ or even just plain old Windows Notepad. Hell, why not even use nano or vim if so inclined.

Copy the text and filenames below and create three separate files and download the icon images:

manifest.json – App manifest JSON file


{

“name”:  “Hello World!”,

“description”:  “My first Chrome App.”,

“version”:  “0.1”,

“manifest_version”:  2,

“app”: {

“background”: {

“scripts”: [ “background.js” ]

}

},

“icons”: {  “16”:  “icon_16.png”,  “128”:  “icon_128.png”  }

}


background.js – App background script Javascript file


 chrome.app.runtime.onLaunched.addListener(function() {

chrome.app.window.create(‘window.html’, {

‘bounds’: {

‘width’: 400,

‘height’: 500

}

});

});


window.html – App window HTML file


<!DOCTYPE html>

<html>

<head></head>

<body>

<div>Hello, world!</div>

</body>

</html>


icon.png – App icon PNG images


icon_16icon_16.png  – (source)

icon_128

icon_128.png – (source)


Cool, so we have all the files in out ‘tutorial-example-1’ folder (or whatever you named this directory) and we can now try to load the app in an unpackaged state and run it in it’s own window.

  1. Go to ‘chrome://extensions’ in Chrome
  2. Ensure the ‘Developer mode’ checkbox is checked
  3. Click ‘Load unpacked extension’ and select the folder you created earlier
  4. Once loaded, click ‘Launch’ in the apps listing (beware of manifest parsing errors)

There you have, a very basic Chrome app, albeit doesn’t really do anything apart from open and print ‘Hello world!.’ Let’s iterate on this example, to make it more input driven. Part 2 ==>

example_1_grab

HTML 45 – First Demo

Finally had some time to sit down and work on the live working demo of my HTML Forty Five game this week. It’s nearing completion of phase v.0.1, which details basic card game features such as:

  • Deck (or array) creation
  • Populating the deck with cards and metadata
  • Shuffling the deck and discarding
  • Displaying the cards on screen using HTML, CSS and Javascript
  • Various promo images

Just working on some final tests to ship this and the publish live soon. Excited to have at last accomplished a milestone of sorts. It’s pretty rewarding to see code that I’ve written do something. Here’s a screenshot of the game/webpage grabbed from Chrome.

ff-demo-v0.1-screenJust need to figure out how to host/upload to Apache web server on a subdomain :-/ Next comes the challenging part. which will be building on the current implementation. I’ll need to write a Dealer class, a Score class, add more Rules and checks for trumps and work on the UI some more. As I’m rewriting the code, I’ll add clearer comments and take some notes for the tutorials which are still a WIP.

Having a lot of fun with Javascript (not so much  with CSS) and I’m trying to wrap my heads Chrome’s CSP policies at the moment. Once I get the anonymous self executing functions, eventListeners and message passing I@ll be good to go. Here’s some JS code 😛

ffgame.js -

var deck, trump, playerHand, player2Hand, player3Hand, player4Hand, discards;

window.onload = init;

function init() {
deck = new Stack();
trump = new Stack();
playerHand = new Stack();
player2Hand = new Stack();
player3Hand = new Stack();
player4Hand = new Stack();
discards = new Stack();

var canRobAce = false;
var canRobJoker = false;
var canRobTrump = false;

deck.makeDeck(1);
deck.shuffle(1);
display();
}

The v0.1 Forty Five demo is hosted/accessible from here, on the 45 sub-domain or download a ZIP of the source.

Finally, some updates and progress

So it’s been a while since I’ve posted an update and a lot has been going on. I’ve been working on some HTML5 and packaged Chrome apps/extensions and scripting for the last few months, but as usual, I got a little distracted and took a bit of a hiatus.

I’ve updated the website theme and I’ll *try* to make some basic improvements and generate some further content. This teaching yourself to code, while working and having a life/family is pretty difficult, but rewarding. I have a basic HTML 45  now (not pretty but great to finally see code doing something), so I’ll try to clean it up and get some feedback on it.

After a bit of a coding break, I’ll attempt to get some momentum going over the next few weeks. May also try and post some further ramblings/tutorials on my process and journey of development while trying to grasp new and ever evolving web technologies and open-source.

Check out some interesting stuff coming out of FabLab Limerick, with 3d printing, laser cutter and CNC.

I’ve linked in some promo/initial concept artwork, that was sort of thrown together.

Feedback/comments welcome

45-promo